

How To Draw Light And Shadow
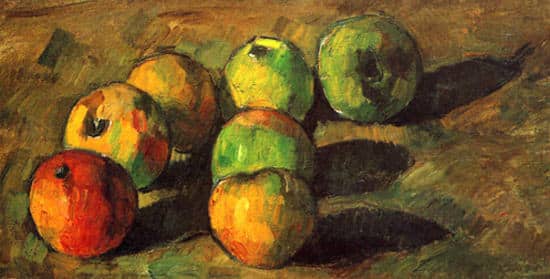
Cezanne, Oil on Canvas, still life with seven apples, 1878
Ever felt frustrated having worked so hard on a drawing – only to find it still looks 'flat'?
Is it the proportions? The perspective? Perhaps the composition?
Whilst these all play an integral part, the most effective method of making your drawings appear three dimensional, is understanding how light logic works.
If line drawing creates the proportions, handling of tone creates the form.
The theory seems simple and the changes in technique small, but applying the principles of how tone, light and shade work, will improve the illusion of form in every drawing you do – regardless of the subject.
And the exciting part about it is, once you 'get' lighting, the principles never change.
In Part 1 of this 3 Part series (Part 2 – Drawing shading demonstration) we look at the theory, the drawing and then paint a simple form focusing on shadow, light and edges.
You might find it isn't your drawing technique that's wrong, but your lighting…
How does light behave when it hits a form?
Predictably.
If we're using one single light source.
The problem is most of the time at home, you don't have one single light source, you have a comfy chair, a cup of tea and 10 minutes to sketch your dog. There's multiple lights coming from above, window lights and maybe lights from a t.v or reading light.
Just by the nature of the lighting setup we have in our homes, it makes it really difficult to achieve a dramatic drawing successfully.
To make something look three dimensional, you need the light to do the work for you – rather than your pencil.
Now I'm the first one to be drawn to my sketchpad whilst enjoying a brew in my lounge, but note the word 'sketch'.
Sketching really helps you to keep your eye practiced and your creativity flowing and I do it every day.
But when I want to work up one of my sketches into a more developed drawing, I would have a more conscious approach to the lighting setup, composition and design of the piece.
Creating the illusion of form using multiple light sources is difficult because the effect of the light falling on an object is more confused, softer and introduces new shapes that don't behave consistently with the object we're looking at.
So I've found the easiest way to learn about light and shadow is by using one hard, single light. It could be the sun, a light through a window or an artificial light.
A hard light clearly demonstrates each distinct area to be aware of, exaggerating the widest tonal range and when you're a beginner it's the simplest way to see the difference between the tones.
So for this 3 Part Series, we'll be looking at single lighting set ups demonstrating the theory of form on a sphere.
Learning simple form principles will enable you to see the fundamental shapes of which all of nature is comprised. The cone, the cube, the cylinder and the sphere.
The principles we'll look at on the sphere, can be applied to the curve of a cheek, the fullness of a teapot or vase and I'll be putting them into practice on a drawing of an apple next week.
Light Logic Using a Single Light Source
Light always travels in a straight line.
The shadows that are made by the light are always in a direct response to whatever the light hits, whatever angle the light is coming from and the intensity of the light source.
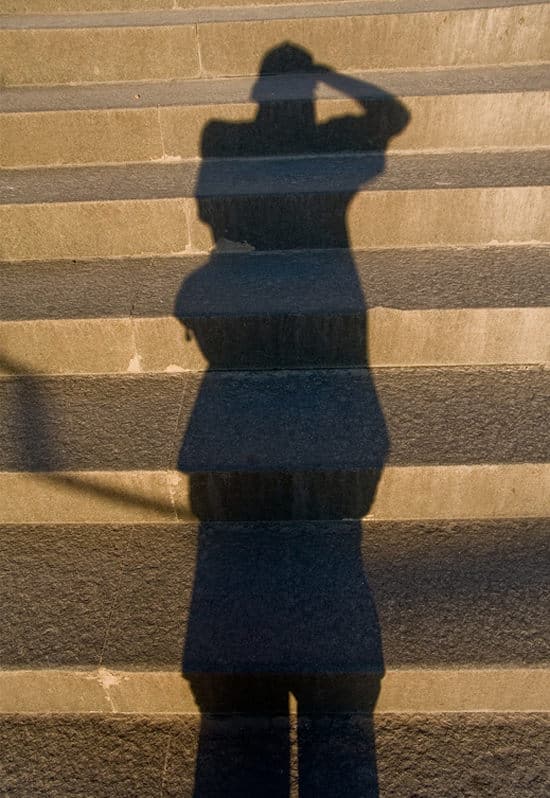
So if bright, high sunshine hits a tree directly from above, it makes a short shadow shape, that doesn't necessarily help you as an artist to describe the subject.
Later in the day when the sun is very low, it will make a longer more interesting shadow shape, usually more representative of the essence of the tree and the presence of light.
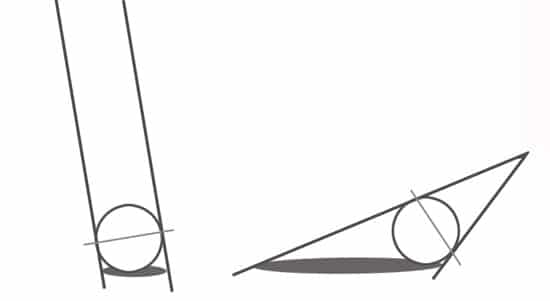
If a single light hits a cube, it will make a square shape – if a single light hits a sphere, an ellipse shape.
This is called 'light logic' and the shadow produced is called a Cast Shadow.
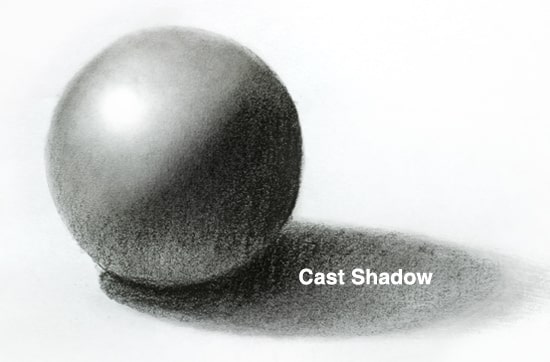
Cast Shadow
The characteristics of the cast shadow are dependent on the intensity of the light source. A hard light will produce a cast shadow with a sharp edge, a soft light will produce a cast shadow with a more blurry edge.
The longer the cast shadow is from the object, the softer the edge of the shadow becomes. Notice how the cast shadow is darkest right underneath the sphere and then it gets lighter and lighter as it goes out further away from the light source.
Also a cast shadow behaves predictability when on a flat surface, but when there are other levels or surfaces in the shadows path, the shape can be altered depending on the surface over which it falls.
This is one of the first things to check on your drawings and paintings. Do the shadow shapes logically sit with the subject and the lighting?
It's all about being aware of where the light is coming from and is it consistent with your picture.
Once you understand the basics of how light behaves, it is quite encouraging to think that a small amount of information can give you the knowledge needed to convincingly portray the illusion of form with any subject.
The 3 areas of a form:
When you're first starting you just need to think of the three simple areas of the form:
1. Light side – This includes the Highlight and the Halftones.
The Highlight is the lightest part where the light directly hits the object.
The Halftones are always going to be lighter than any value on the shadow side and blend into the shadow side (sometimes they can be split into light half tones and dark half tones)
2. Shadow side – This includes the Form Shadow, the Form Shadow Core and Reflected light.
The Form Shadow Core is the darkest part of the shadow, the rest of the Form Shadow is made up of dark tones that blend away from the core shadow into the reflected light, if there is any.
Reflected light is the light reflected onto the subject, from the surface it sits on or ambient light around the object.
3. Cast shadow – This has 3 parts.
The darkest part that sits directly under the object, the mid tone that makes up the majority of the cast shadow shape and the lightest, softest tail of the cast shadow
Creating the shadow line

The shadow line is the transition between the light side and the shadow side.
This can have many names, bed-bug line, shadow line, terminator, form shadow line to name a few. The main thing to remember is to keep each area clearly defined.
Keeping your light tones in the light side and your darks in the shadows whilst maintaining a soft transition between the two is what we're trying to achieve.
This seems obvious but making the smooth transition between the lights and the darks is no mean feat as the shadow line actually falls over quite a small area and not forgetting probably the most tricky thing – retaining the fullness of the globe shape.
What can happen is you gently lighten your pencil marks and try to build up a nice blend.
The problem is the darker side spreads, it creeps, you work harder and harder, you then think your eraser will fix it.
It didn't.
Now the darks have a too severe edge and you've started to lose the lovely shape you first had. Your shadow line has gone North, your light logic has now become illogical and your light side has become darker with all that flurry of blending!
It is tricky but it just requires practice and a few techniques that we'll look more in depth at next week.
The Light Side
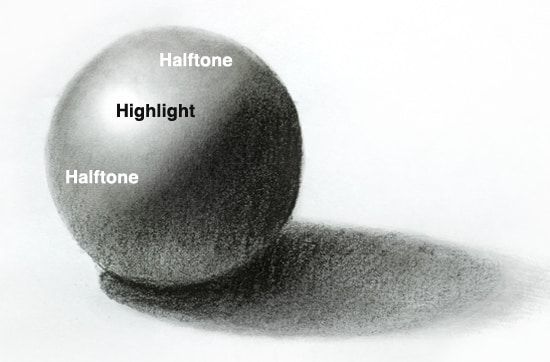
The Highlight is the very lightest part. It's where the light directly hits the object so is the best indicator when you look at your subject to determine where and at what angle the light is coming from.
Highlights make the drawing come to life.
The Halftones blend into the shadow side and make the highlight appear white. They are always lighter in value than the lightest value on the shadow side.
The Shadow Side
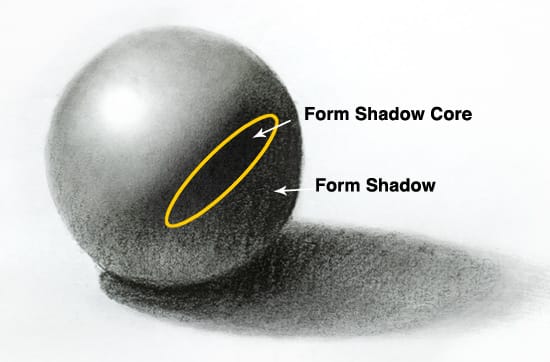
If a Cast Shadow is always hard (albeit with blurry edges sometimes) a Form Shadow is soft.
It is the dark side on an object not facing the light that reveals the form and mass of the shape.
The very darkest point within the Form Shadow is called the Form Shadow Core.
It falls under the Shadow Line (or Terminator) on the dark side and is where there is no light hitting the surface.
It blends into the rest of the Form Shadow which is lighter in value because reflected or ambient light within the scene.
The Allure of Reflected Light
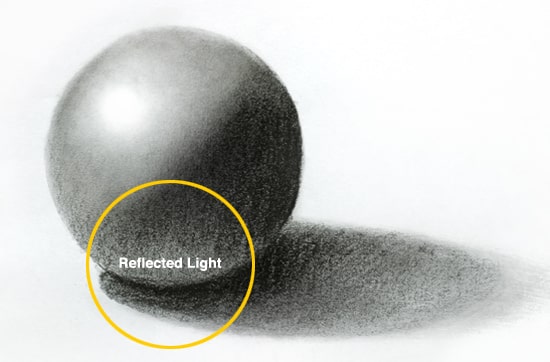
Reflected light is when the light is reflected onto an object, from the surface it sits on. White or shiny surfaces reflect the most light, dark or black surfaces reflect the least amount of light.
The sphere above is sitting on a matte white piece of paper.
When you're first starting drawing it is easy to become obsessed with reflective light, it seems sophisticated and so subtle.
More often than not, what happens is you 'look into your darks' too much and over exaggerate how light that area actually is.
You then lose that initial simple light concept we had first established when 'mapping out' from a light and shadow side.
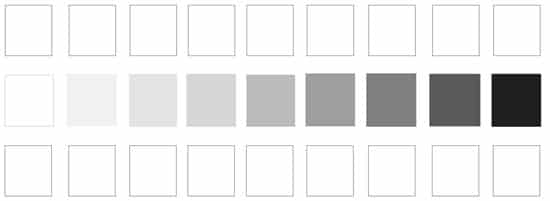
You can print out this guide and practice matching the tones with your pencils
When you're turning a form away from the light, using the tonal value strip above will be invaluable.
Because you will be really tempted to try to use a lighter tone than you need, being able to check your values will enable you to keep the illusion of light consistent.
When reflected light is handled well, it can give your drawings that 'How did you do that?' response – so it's worth taking the time with.
Next week we're going to put these theories into practice in my studio, where I'll set up and draw an apple.
When working on three dimensional drawings, the two things I focus on are form and edges. We'll also create some quick sketches to map shadows and cover drawing techniques on turning a form.
Get the kettle on, your pencils out and as you sketch, start to observe more carefully the light fall and the shadows that are being created and join me next week in the studio.
You Might Also Like:
1.A Beginners Guide to Light & Shadow : Part 2 – Practical Drawing Tutorial
How To Draw Light And Shadow
Source: https://willkempartschool.com/a-beginners-guide-to-shadow-light-part-1-drawing/
Posted by: mcdougalthilbod.blogspot.com
0 Response to "How To Draw Light And Shadow"
Post a Comment